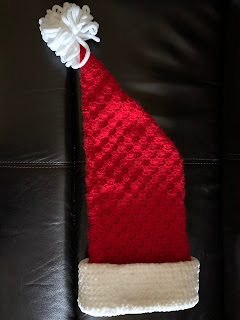
Sunday, December 19, 2021

Santa's Hat (matches the Grinch Scarf)

After making the Grinch scarf, I decided to make a matching Santa hat.  I wanted to use the same stitch pattern, corner-to-corner.

Dimensions

Length of red part of the hat, measured to pointy tip: 21.5"

Width of red part of hat: 9"

White cuff: 4.5"; when folded over, about 3 3/4" of the cuff is visible.   Since the cuff has to be wider than the hat, the cuff measured 10" wide, lying flat.

Materials

Red Heart Supersaver - Cherry Red - about 275 yds

Bernat Baby Blanket - White (for cuff and pompom) - about 45 yds. (Note about this yarn: I've read that if you use this yarn with loose stitches, either loosely made or the taller stitches in crochet, the yarn will start to "worm" as you wear it/wash it. That means you end up having floppy loops hanging about.  The yarn is slippery and slides by itself easily.  It was recommended to stick with tight single crochet (sc) stitches to prevent this.  It is used very successfully for making amigurumi figures in this manner.  So be forewarned!)

Crochet hook US H (5.0mm) and US I (5.5mm)

Gauge

13.5 x 13.5 "C2C squares' =10" x 10" using H hook.

Instructions

In order to decide how wide to make the hat, I used my scarf to measure.  I wrapped the scarf around my head, covering my ears the same way I wanted the hat to do so.  This turned out to be 27 squares (the c2c squares) for me.  Choose an ODD number of squares, closest to your hat size.  Since the brim is pretty firm without much stretch, round up, rather than round down if it's 50-50 one way or the other.

Alternatively, measure the circumference of where you want the brim to lie, subtract 2" and work c2c until the short side of your triangle measures this dimension. Choose an odd number of squares that gets you closest.

So, I proceeded to make the hat flat, 27 squares wide using the corner-to-corner technique.  That meant working from one corner until I had 27 rows completed.   I then had a triangle, 27 squares along each side, 27 squares along the diagonal. At this point, one of the short sides of the triangle is the size of your hat brim, the part that goes around your forehead, over your ears and to the back of your head. Now you decide how many additional rows you want to work. If you fold the triangle in half like this (Fig 1) and measure where indicated, it will tell you the measurement where the narrowing of the hat will begin.  For my hat this was 10".  If you measure from the top of your nose bridge even with your eyebrows over the top of your head this will tell you where the hat will begin to narrow.  For me, 10" was sort of the back top of my head.  I wanted it a little longer so I aimed for about 13" so I needed 4 more rows.

Fig 1

Work 'even' (no more increases in number of squares) the length you decided.  By this, it means you will no longer increase along one side, the same as you did with the scarf when making the sides straight.  Each row, for me, was 27 squares.  I worked 'even' for 4 more rows of 27 squares each.

Now my hat looked like the yellow portion of Fig 2.

Fig 2


I am now going to work with a smaller swatch for illustrating the instructions.  I'll use yellow and green as in the diagram, scaled down for brevity, but it all works the same on a full size hat.  You would use red for both of the sections in yellow and green.  I am just showing two colors for clarity.

Here's my mini-hat, Fig 3.

Fig 3

 I am at the same place you are, just finished the length I want.  Now, I will start with green.  You stay with red, but follow along for the process.  

If you ended at the tip of the hat, ch1, clip yarn (leave a long tail to use for sewing the long edges together) and draw through the last loop, flip over so the point is on the left top, and join the yarn at the lower right of the slanted row.  If you ended already there at the lower part of the slant, then flip over and keep going.

Do the next row as you normally would, but go HALFWAY up the row.  Since you have an odd number of squares, you will go ONE LESS than half-way, for my mini swatch, that's two squares.  End with the sl st to the next square and stop at this row, Fig 4.

Fig 4


The next square we want to do is going to be straight above the current one.  We know how to do that: turn, ch 6, in the 4th dc from the hook work 1 dc, then work 1 dc in the next ch, 1 dc in the next ch, sl st etc. Continue as usual making squares along the diagonal until you get to the last column, Fig 5. 
Fig 5

We want to keep this edge vertical.  We know how to do that: ch1, turn, work 2 sl st, then, in the ch-3 loop one more sl st. Ch3, work 3 dc in the loop, sl st to the next square, as usual; keep doing the squares as usual until you arrive one column BEFORE the last square in the previous row.  For my test swatch, I am already there, Fig 6.  For yours you'll be working several squares before you get to this point.  The idea is that this row will be ONE SQUARE SHORTER than the previous row.  For my previous row I had 2 squares, so this row will have one. The arrow points to the last sl st made, thus ending this row.

Fig 6


Now I need to go straight up from this point.  We know how to do that: turn, Ch6, 1 dc in the 4th ch from hook, 1 dc in next ch, 1 dc in next ch.  Sl st to the ch-3 loop of the square below and over 1.   Because I've made such a small swatch, I am done because there's just one square at the point.  On your hat you will have several rows, each one having one fewer squares in it, until you get to the last row where you are making just one square at the point, Fig 7.  


The two sides of the hat are symmetrical and look like Fig 2.  In summary, you will work the yellow rows as shown in Fig 7, then the green rows.  When doing the yellow rows, you do normal c2c.  When doing the green rows, you keep one edge straight and the other edge shorter, one block at a time... you move up vertically one column sooner than you would if you were doing a normal straight edge.  You stop when you have made a row with just one square in it. After the final sl st: ch1, clip yarn (if you don't have a long sewing tail on the other point, make one here) and draw through the last loop. 

Fig 8

Sewing

Fold the hat in half lengthwise and using mattress stitch, stitch the two long sides together. Weave in the ends.

With the two slanted edges lined up, with the bottom of the V toward you and the points farthest away, place the edges near each other as in Fig 8.

Abbrev: dc3tog = in the same stitch: (yo, insert hook in stitch, yo and draw through stitch, yo and draw through 2 loops) 3 times, yo and draw through all loops on hook.

Attach red yarn at purple dot. Work dc3tog in purple space, sl st to green dot.

Connector: Ch3, dc3tog in yellow area, sl st to yellow dot, turn, dc3tog in orange area, sl st to orange dot, turn.

Repeat "Connector" all the way to where the points meet.  At the point: ch3, dc3tog in lime green area, turn, dc3tog in blue area, ch 1, cut yarn, draw through last loop, weave in ends.

Cuff

Using H hook and white blanket yarn, work with the outside of the hat facing toward you. (This will make a finer "popcorn" look to the cuff when turned; if you like the coarse texture then you should work the cuff with the inside of the hat facing toward you.) 

Back of sc

Front of sc

Ch 1, work sc around the edge of the hat, sl st to the starting stitch. Work tightly for two rows. On the next row, switch to the I hook for the remainder of the cuff.  Work sc rounds until cuff is the depth you wish.  I worked the white 4.5"; when folded over, about 3 3/4" of the cuff is visible.  Be sure to try on the hat frequently as you work the white to make sure the fit is correct.  Since the cuff is by necessity being done with tight sc stitches (see the note above, with the yarn specification) there won't be a lot of stretch, so fit is important.

Pompom

With blanket yarn, wind the desired number of loops around a piece of cardboard with the desired width.  I used 2.5" and 45 loops. You will not cut the loops.  Use a long piece of cardboard for wrapping, so you can keep it to one layer of loops.  This makes sure all the loops are the same size.  Use a doubled length of yarn drawn through all the loops to tie a knot around the loops.  Remove the cardboard and shake the pompom and separate the loops to make it a random tassel of loops.  Do not attach to the hat yet if you plan to soften the hat by washing it first.  Leave a long enough length of yarn on the pompom to tie it to the hat.

Finishing

For acrylic yarn, wash the hat and dry in the dryer with fabric softener to fluff and bloom the yarn.  Attach the pompom after this. Tie the pompom to the end of the hat using a shoelace knot, with an extra overhand knot, just like you would secure your shoelaces.  Remove the pompom to wash the hat. Wash the pompom by hand when needed.  Fold the cuff over, leaving two rows of white stitches on the inside. 

To wear the hat

The part with the 'hump' in it is on the top of your head; the straight edge is against your back.  Flop the hat to one side or the other, or squish it straight down your back.


Monday, December 6, 2021

Grinch Scarf

Finished size 68"x6"

Materials:

170 g Red Heart Supersaver - Cherry Red

37 g Red Heart Supersaver - Spring Green

Red Heart Supersaver - White for stripe

Red Heart Supersaver - Bright Yellow, and Black for face

White Bernat Baby Blanket for pompom

Crochet hook US H (5.0mm)

Instructions:

Lots of Youtube videos for how to do corner-to-corner crochet (search "c2c crochet") using this stitch. For example:

https://www.youtube.com/watch?v=I5G9IM24LFU

Part 1: Using green, make a triangle 9 squares x 9 squares as follows:

1. Ch 6.  In the 4th ch from hook, make 1 dc; 1 dc in each of next 2 ch; turn. One row of squares completed.

2. Ch 6.  In the 4th ch from hook, make 1 dc; 1 dc in each of next 2 ch;  Look beyond the next 3 dc's and note the loop formed by the chain at the end of the row (make sure your work is still turned. See Fig 1).  Sl st in this loop, ch 3, work 3 dc's in the loop. It should look like Fig 2 now. Two rows of squares completed (2 squares in this last row). Turn.

Fig 1


Fig 2
 

3.  Ch 6.  In the 4th ch from hook, make 1 dc; 1 dc in each of next 2 ch;  Look beyond the next 3 dc's and note the loops formed by the chain at the end of the row in each of the TWO squares (make sure your work is still turned) making up the previous row.  See Fig 3.  In the loop indicated by arrow 1, sl st in this loop, ch 3, work 3 dc's in the same loop. In the loop indicated by arrow 2, sl st in this loop, ch 3, work 3 dc's in the same loop. It should look like Fig 4 now. Three rows of squares completed (3 squares in this last row). Turn.

Fig 3

Fig 4


Repeat Row 3, increasing one square in each successive row until 9 rows are completed in total and the last row has 9 squares.  It should look like Fig 5 now.

Fig 5

Part 2: We'll now continue even with 9 squares along the diagonal as follows:

1. Turn the work.  Skip 1 dc and sl st in the top of next 2 dc's as indicated in Fig 6.  When completed, it will look as in Fig 7.   In the loop indicated by the arrow in Fig 7, sl st in this loop, ch 3, work 3 dc's in the loop.  Continue as usual, repeating (sl st, ch3, 3 dc's) in each loop across the row.  9 squares made.


Fig 6


Fig 7


2. Ch 6.  In the 4th ch from hook, make 1 dc; 1 dc in each of next 2 ch;  Look beyond the next 3 dc's and as before (skip 3 dc's, in the chain-loop work 1 sl st, ch 3, then 3 dc in the loop).  Repeat across the row as usual.  When you get to the last square, sl st in the ch-3 loop, turn.  9 squares made.  This edge will remain straight and will be the longer of the two straight edges of the scarf (68", or as you wish).

Repeat 1 and 2 until 15 rows of squares on the long side (7 rows of squares on the shorter side).

Join white and work 4 rows even with 9 squares on the diagonal.

Join red and work until scarf measures 68" along the longest side (or desired length).  End on a row which leaves the yarn tail at the very tip of the point.

Weave in all ends.

Make face as described below.

Eyes:

Yellow part (make two) (Note: illlustrations are in white, but you will make the eyes with yellow yarn.)

1. With yellow, make a slip knot and put loop on hook.  Ch 2

2. 3 sc in 2nd ch from hook, ch 1, (Fig8) turn.

Fig 8 (end of row 2, before turning)


3. 2 sc in each of 3 sc's, ch 1 (Fig 9), turn.

Fig 9 (end of row 3, before turning)


4. 1 sc in first sc, 2 sc in each of 5 sc's, ch 1 (Fig 10), turn.

Fig 10 (end of row 4, before turning)


5.  Skip first sc, (2 sc, 1 sc) 5 times, ch 1 (Fig 11), turn.

Fig 11 (end of row 5, before turning)


6.  Do not skip the first sc, 1 sc , then (2 sc, 1 sc) 10 times (Fig 12). Ch 1,  clip yarn and draw through the final loop and tighten.  Weave in ends.

Fig 12 (end of row 6, before finishing off)


Pupil (make two):

With black, using a tail about 10" long, make a magic ring (magic circle). (Magic circle on Youtube.) Ch 2, then work 14 dc in the magic ring. Draw ring up to make a tight circle. Clip yarn with another 6" tail. Draw the yarn through the last loop (top of last stitch).  Thread a yarn darning needle with this tail and weave it through the top of the first dc of the ring and then back through the loop at the top of the last stitch.  Weave in ends. 

Brows:

With black, make a slip knot, put on hook, ch 3, sl st to the first chain. Sc along the upper edge of one yellow eye, ch3, sl st along the upper edge of the second eye.  Ch 3, sl st through 3 ch from hook. Clip yarn and draw through last loop.  Weave in ends.

Arrange pupils on eyes and sew with black sewing thread. Set aside.

Nose:

1.With green,  ch 2; in 2nd ch from hook work 4 sc. One nostril made.

2. Ch 3; join with sl st to 3rd ch from hook; turn.  In the ch-3 loop just formed, work 5 sc; turn.  In the SAME ch-3 loop, work 7 sc, covering the sc from the previous row (this makes the middle part of the nose a bit puffier).  Pull the last sc just made tight.  Main pug of nose made.

3. Ch 2; in 2nd ch from hook work 4sc. Second nostril made.

4. Work 1 sc in the ch-3 loop from step 2.  Draw tightly. Ch 1, clip yarn and draw through the loop of this stitch and pull up to fasten off.

5. Join black yarn and work sl st loosely in all the stitches around the nose parts, making an outline. Clip yarn leaving a tail; draw through the last loop made.  Using a yarn darning needle work the yarn around the first black sl st and then back to the last to make a continuous chain.

Weave in ends.

Pompom:

With boucle blanket yarn, wind the desired number of loops around a piece of cardboard with the desired width.  I used 2.5" and 45 turns. You will not cut the loops.  Use a long piece of cardboard for wrapping, so you can keep it to one layer of loops.  This makes sure all the loops are the same size.  Use a doubled length of yarn drawn through all the loops to tie a knot around the loops.  Remove the cardboard and shake the pompom and separate the loops to make it a random tassel of loops.  Do not attach to the scarf yet.

Finishing:

 Arrange the eyes and nose on the green end of the scarf, as shown.  Plan the shape of the mouth.  Sew down the eyes and nose with blind stitches.  Using embroidery chain stitch, outline the mouth in black.

 For acrylic yarn, wash the scarf and dry in the dryer with fabric softener to fluff and bloom the yarn.  Attach the pompom after this. Tie the pompom to the end of the scarf, using a shoelace knot, with an extra overhand knot, just like you would secure your shoelaces.  Remove the pompom to wash the scarf.


Monday, April 27, 2020

Knitting swatch - Lace Insertion - Faggot stitches

I solved a pattern request on Reddit and made a swatch.  Might as well record it here.  Repeat rows 1-4

1.  Was the correct solution to the Reddit user question:
The part in red:

Row 1: K1, (yo, K2tog) 2 times
Row 2: Purl
Row 3: (SSK, yo) 2 times, K1
Row 4: Purl


2. The part in red (includes one more column each side)
Row 1: K2, (K2tog, yo) 2 times, K1
Row 2: Purl
Row 3: K1, (SSK, yo) 2 times, K2
Row 4: Purl

3. The part in red (includes one more column each side)
Row 1: K2, (K2tog, yo) 2 times, K1
Row 2: Purl
Row 3: K1, (K2tog, yo) 2 times, K2
Row 4: Purl

Monday, February 4, 2019

Luggage Lock TSA20 Instruction Manual (Manufactured by Lewis N. Clark, L.C. Industries, Chicago, IL)


While traveling, I had opened the TSA20 lock and unknowingly put it into an unknown mode... I could not pull the shackle up out of the lock and it was stuck in the down mode, but not with the open end of the shackle plugged into the shackle socket.  If I turned it the shackle, it turned the numbers and nothing I did with the numbers allowed me to release the shackle.  I thought it might be in the mode to reset the lock combination. But I didn't have the instructions. I was now unable to use the lock and the instructions were home, not with me. I've posted them here for myself and anyone else who might find them useful.

To solve my immediate problem, I found youtube instructions for how to open a lock if the combination was forgotten, but not how to handle setting the lock combination or how to get out of this mode.  I managed to use the youtube instructions for releasing the lock (I inserted manicure scissors into the key hole and turned 90 degrees and that allowed the keyhole portion to be pulled out of the lock and that seemed to release the whole thing.  Indicates just how easy it is to unlock this lock by anyone with a pair of pointy tweezers or manicure scissors, or a key you can buy on Amazon.).  Anyway, here are the instructions that came with the lock.  Not sure how I got it in the funky mode, but I think I pushed the lock shackle in while the combination was set, but I pushed it in without aligning it to the socket for the shackle--it was slightly off.  Nervous this might happen again.


Monday, November 16, 2015

Wheat Ear Rib Stitch (Knitting)


Flat knitting:
A multiple of 6 stitches, plus 3.
Rows 1 through 4 are the set-up rows.  Rows 5 through 8 are repeated the desired number of times.

Row 1 & 3: p3, *k3, p3; rep from *
Row 2 & 4: k3, *p3, k3; rep from *
Row 5: p3, *wyb, insert right needle into center k st of next rib FOUR rows below (i.e Row 1), draw up a loop from the working yarn onto the right needle, extending the height to be even with the other stitches in Row 5; k3; using the same hole where you made the previous loop, draw up another loop on the right needle, again extending the height of the loop to be even with the other stitches in Row 5; p3; rep from *
Row 6: k3, *wyf, sl loop pwise, p3, sl loop pwise, k3; rep from *
Row 7: p3, *wyb, sl loop kwise, k1, psso, k1, k2tog (you are knitting the next st with the loop that follows), p3; rep from *
Row 8:  k3, *p3, k3; rep from *

In the round:
A multiple of 6 stitches.
Rnds 1 through 4 are the set-up rnds.  Rnds 5 through 8 are repeated the desired number of times. 
Rnds 1 - 4:  *k3, p3; rep from *
Rnd 5: *wyb, insert right needle into center k st of next rib FOUR rows below (i.e Rnd 1), draw up a loop from the working yarn onto the right needle, extending the loop height to be even with the other stitches in Rnd 5; k3; using the same hole where you made the previous loop, draw up another loop on the right needle, again extending the height of the loop to be even with the other stitches in Rnd 5; p3; rep from *
Rnd 6: *wyb, sl loop pwise, k3, sl loop pwise, p3; rep from *
Rnd 7: *wyb, sl loop kwise, k1, psso, k1, k2tog (you are knitting the next st with the loop that follows), p3; rep from *
Rnd 8: *k3, p3; rep from *

Friday, August 7, 2015

White Cotton Afghan - Decoded

Facebook post by Sue Miller (Aug 5, 2015 post in Crochet Fanatic group) showed the following afghan she liked:


I decoded the pattern - it looks like the real afghan is in white cotton.  I used worsted acrylic.  Mine is fuzzier, but I think I got the pattern right.


And the pattern that I figured out:

Cast on 15

Knit 6 rows (garter st) before beginning pattern.

R1:  K4, (YO, K1) 7 times, YO,    K4
R2:  K4,  P15                ,    K4
R3:  K4,  K2tog, K11, SSK,        K4
R4:  K4,  K2tog, K9, SSK,         K4
R5:  K4,  P2tog-tbl, P7, P2tog,   K4
R6:  K4,  K2tog, K5, SSK,         K4

Repeat for length desired.
Knit 6 rows garter st.  BO.

Combine strips to make afghan of width desired.

My swatch was Size 6 needle and regular weight yarn.

It looks like the strips were joined with a crochet join.  Edging is a garter stitch sawtooth with a couple of YO holes in it.


Saturday, November 1, 2014

E-Z Stitcher Instruction Manual

Found a cool gadget from 1953.
AND the manual is included!


It uses standard sewing machine needles.  Fantastic!